

Keep it Between the Pleats (+ DIY Tutorial)


I have been looking for the perfect pleated leather skirt but my luck hasn’t been so great. A few months back I purchased one from H&M but just the thought of leather at the time made me sweat and when I said sweat, I’m talking the “Sweaty Axe Commercial” sweat… so I returned it. Since it’s getting a little chilly now, I wanted it again but it’s sold out everywhere (don’t you hate that?).
Then I came across the Alice + Olivia pleated leather skirt but too bad it was sold out as well… Plus I didn’t feel like forking out $396 for a skirt. So what’s a girl to do? Make it? Why the hell not.
 [Photos by NR]
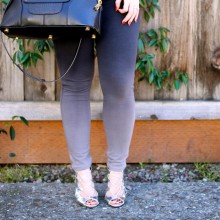
Top: Forever 21 crop tank, Dollman denim vest (similar here)| Bottom: DIY (faux) leather pleated skirt | Shoes: Classiques Entier cap toe pumps | Purse: Marc Jacobs Crosby Sutton bag | Bracelet: Michael Kors ‘Collections’ two-tone link chain pave bracelet (similar here and here) | Belt: studded leather belt (old, similar here and here)
* * *
We had the pleasure of attending the GAP Fall 2012 “Icons Redefined” Collection x LookMazing event in the heart of SF on Wednesday night. It was such a blast getting styled by the Gap stylists, took photos in LookMazing’s photo booth and sipped on champagne. My girl Sab from Rouge Spark looked so freakin’ cute with a full outfit makeover and even Nate came back decked out in yellow rolled up pants and an orange shirt! I on the other hand was a party pooper and only changed my top. Booo to me! But I had an excuse…I couldn’t take off my newly DIY skirt! :)
Continue Reading below for DIY tutorial

What you’ll need:
– 1 yard of leather
– sharp scissors
– a sewing machine
– black thread and needle
– heavy duty needle for sewing machine
– a measurement tape
– a box of thin pins
– an iron
– someone’s t-shirt (not yours)
I purchased 1 yard of faux leather (vinyl blend). They are also available at Joann’s Fabric in various texture ranging from $9 to $25. Be sure to use your 40% off coupon!

1) Start by cutting the fabric as indicated in the photo above. The 4 in will be your waist band, the two 16 inches will be sewn together to make your skirt (see below).

2) Lay the two 16 inches together and sew along the edge (see above). Now you’ll have one long 16 inch fabric for pleating.

3) Start pleating by folding the fabric over (see above) and pin each pleats at the top and bottom. Tip: some pins may leave holes in your vinyl or leather so be sure you’re pinning where you will trim the holes away.
Once you are finish pinning your pleats, wrap it around your waist so you can get the exact measurement and trim off any excess fabric (be sure to leave at least 3 inches on each end for the zipper). My waist size is 25 and after the pleating and zipper edges, there was about 8 inches of fabric left.
Once you’re sure the skirt fits around your waist, use your sewing machine to sew 1/2 inches along the edges of the top of your skirt (see above photo). Tip: Sewing on vinyl or leather with your sewing machine is best with a heavy duty needle and always sew on the cloth side. I tried running the needle down the vinyl side and it kept creating large holes and jamming my machine.

4) Now it’s time to iron! Set your iron to Wool and let it sit for 3 minutes. This is the part you have to be very careful, if not you can burn your fabric. Start with the back and softly press along the pleats for no more than 1-2 seconds at a time. Any longer and it may melt the other side.

5) I know I said you have to be careful in step 4 but you’ll need to be extra careful here. Since you are ironing the top layer, it can melt with an instant touch of the iron. To eliminate this from happening I used Nate’s t-shirt (shhhhhhhhhh). Same drill as step 4 but very gently and quickly iron along the pleats.
6) Repeat step 4 and 5 again until all the pleats stays put.

7) Now it’s time to iron the waist band. Fold the 4 inch waist band in half and iron on the cloth side (gently and quickly). Repeat until you create a crease then open and refold so the leather/vinyl is showing.

8) Sew 1/2 inch of the waist band to the skirt by hand first to keep it in place. Than run it through the sewing machine. Again, be sure to sew from the cloth side.

10) Almost there (whew), attached the ends by sewing in the zipper and finally trim the bottom of the skirt to your desired length.
After attaching the waist band to the skirt, the total length is 17 inches long from the waist down (skirt 15.5 + waist band 1.5). After trimming the ends, the final result of this skirt is 15.75 inches.

All done! I hope you enjoyed this tutorial…I didn’t get a chance to take photos every step of the way so let me know if you have any questions! xo – KTR


[…] stripes blouse (similar here and here) | Bottoms: DIY pleated (faux) leather skirt (tutorial HERE) | Shoes: Valentino rockstud t-strap black pumps | Bag: Milly | Accessories: ASOS wide band ring […]
Working on this as we speak. When held up against me, it fits around my waist, but not my hips, this is okay right?
genius!!!!
Brilliant! Lovely skirt and brilliantly simple tutorial!
This is great! I’ve already bought and cut some faux leather for my own skirt, but I was having a difficult time getting the pleats to stay in place. Since I bought the costume leather (you know, the super-realistic cheap kind that comes out before Halloween), I’ve been a little scared to iron it, but the t-shirt idea is genius! I’ll definitely be trying that later tonight! Thanks!
This is seriously awesome!I had spotted the same skirt at H&M and I didn’t bought it for the exact same reason!Ever since I was beating myself up.because I really wanted a pleated leather skirt!Thanks so much for the DIY!
[…] this pencil skirt with my favorite bow details from the left over materials from this pleated (faux) leather skirt, but I probably won’t be making another one of these for a while. Sewing with faux leather, […]
I cannot believe that you made this fabulous skirt yourself. WOW! Fantastic skirt!
Great look, too.
You have a new follower.
http://theleatherskirt.blogspot.com/
Oooh, I definitely want to try this one! It’s perfect for fall, too. And I love the look! You look amazing as always! :)
I’m sorry I’m still processing the fact that you MADE a PLEATED leather skirt YOURSELF and it looks amazing. Sorry for the caps but I’m just like in awe right now. Great job. I can’t craft anything to save my life so I won’t even kid myself trying to read the tutorial but MAJOR kudos.
Girl you are killin’ it! The skirt turned out amazing and I don’t think I would have wanted to take it off either. I think you may need to give e some serious DIY sewing tutorials. I’m lost. The pics from the event turned out great. Still so sad I missed it but it would have been worse had I not iced myself down. My left chin area along with others is still bruised and achy :(
xo
nic
mymannersandmoxie.com
Amazing! I can’t believe you made that pleat leather skirt – you’re a star. I don’t think I have the patience but I think it’s such a great idea. I just posted my pleat skirt post too :) Great minds think a like xo
http://www.tstyledme.com
Tien xo
Love this girl! Great DIY! I will be getting a sewing machine soon, and I have no idea how to use it, but maybe one day, I can come back to this to make my own! I am obsessed with these leather pleated skirts and it would be so great if I could make my own!!! I think I can do this though if I learn to use my machine and learn to sew zippers. It may take me forever, but I will get it! You are so fab and creative! Love your designs and you should sell these! xx, Pip
http://easyoutfitsbypip.blogspot.com
I can’t believe the skirt is DIY, you did an amazing job! I love the classy & chic way you styled it, you look great!
It’s so lovely of you to share your sewing DIY but I am too lazy to do this even though I have a sewing machine, lol. Do you just sew for a hobby or do you do this for a living? I really think you need to open up a shop with your own collection soon! Your work is too lovely to not have other people wear it!
Marisa
http://style-rhapsody.blogspot.com
Hi Marisa, I do it as a hobby outside of my 9-5. I wish I could do it for a living because I love making things, but maybe one day :)
You are so awesome KT….I love how you dress up to enhance & not hide your assets! And you DIYS? ….so ingenious & resourceful!!! More power!
Rebecca
http://www.redtagchiclosangeles.com
This is so awesome! I love it when you post DIYs or just anything you make. I have been following you blog just so I can see what you’re making. You are so talented! Just a question though, how old are you?
This is so awesome, I wish I had a good sewing machine to try this diy out, I’ve been wanting a leather skirt for the longest time and this is a perfect way to get one that fits great.
Awesome outfit! Love those classic pumps and kudos for the DIY-ed skirt :)
Claudia
So talented! I tried using leather/vinyl before and it was a disaster so I agree when you stressed about using a heavy duty needle and ironing carefully. The part that made me LOL was when you said to use someone’s else skirt! Too funny! Also that Axe commercial is too freaking funny as well. Love this post so much!
Cute!!!
Are you gonna sell this one also?
Hi Melissa – I probably won’t but I’ll be adding a fab leather inspired piece debuting in September! :)
You are too damn talented, makes me sick! :) Love this skirt!
xo Ashleigh
http://www.thedaileigh.com
You already know how I feel about that AMAZING skirt! In my humble opinion, photos don’t do it proper justice because it’s even more gorgeous in person! It’s really the perfect combination of leather and pleats! I am super digging your original look from that night–the beyond perfect mix of sass, edge, and class. I also liked your Gap plaid shirt with the skirt, which only confirms my suspicions that it’ll look fantastic with almost everything.
I was going to comment on your bag and shoes… but if I did, this comment would probably be essay-length by now. ;)
:* :* :*!
xoxo,
Sabby
http://www.rougespark.com
Okay, I HAVE to try this. I’ve been obsessing over DIYS and this is perfect! Thank you!
http://www.chasingskylines.com
That’s amazing! Now I wish I had a sewing machine. LOL! (Or that I knew how to sew in general…)
You look super cute in the 2nd photo! Love your hair like that too :)
Holy crap! I didn’t believe you actually made this until I saw the how to instructions. Wow, now I must try to do this over the weekend. So cool, you’re such an inspiration doll!
Thank you so much for sharing! I will try to make my own this weekend. Love the outfit!
http://www.IvonneStacyStyle.com